A Scrappy Quilt with Scrappy Binding (& even Scrappy Quilting!)!
I finished my third ever quilt this week! It’s another scrappy improv quilt much like my first one – except bigger!
I got the idea for it when I was learning how to bind my first quilt. I was learning the technique where you join two strips of binding by sewing them right sides together at 45 degree angles on one end to make one long continuous strip.

It got me thinking that might be a fun way to make a larger strip on a quilt top.
This post also appears on our sister site Upcycle My Stuff.
This post contains affiliate links – please see my disclosure policy for more details.

I had some colourful remnants and bolt ends from ebay purchases and some other projects.
But I’d also discovered from doing my more pieced learner’s quilt that I prefer quilts that have a bit more negative space to them (my learner’s quilt was lots of sampler blocks squished together!).
So I looked around some other scraps of white and off white for the background to really make my colourful scraps stand out.
I had some leftover white fabric already in various shades and materials – some cotton some poly cotton. But it wasn’t quite enough.
I did a bit of online searching and found someone selling some strangely shaped off white strips on Ebay that they had left over from another project. They required quite a bit of trimming as they were cut on a curve on each end but they were close enough so I went for them.
I didn’t have an exact size I was going for just bigger than what I’d made before! I wanted a big quilt I could cuddle up in. I laid everything out on the floor to get an estimate of how big it would be.
Scrappy Strips
My basic idea was to have different height strips of my coloured fabrics attached at that 45 degree angle like a quilt binding and to have each coloured strip framed by a white/off white background.

It was meant to be a quick project, but it wasn’t really all that quick! Mainly because I did a lot of fiddling around with what order I wanted the rows in and also because I ended up not using some of the strips I sewed together. see the photo above and try to spot the strips that didn’t make the cut into the final quilt!
It also took me a while to trim all the rows to make them roughly a rectangle shape! Math was never my strong suit so I didn’t do it in a very structured way!
Scrappy Quilt Back
I also had lots of smaller scraps of these fabrics after I’d made my coloured strips. I had all the triangles I’d cut off when making the 45 degree joinings.

And so of course I wanted to use them all up! I made blocks of completely different sizes just based on the scraps I had left and then set them in a sort of a frame (ish) pattern on the back of the quilt – mainly because I had one big piece of white fabric for the middle of the back and lots of smaller scraps to make up the border – so my improv blocks sat in between.

Basting Errors
One of the challenges I had with this quilt was around the basting.

I used June Taylor’s basting spray.
I don’t know if I’m just not using it right, but I just seemed to get small little folds in various places even thought I did try to follow the instructions and start from the middle and work my way out.
I recently got a tip from someone about just basting by spraying your quilt sandwich with water and then ironing it dry. I might give that a go next time! Anyone else have any good tips? Leave them in the comments if you do!
This was also my first time using proper quilt batting. For my first two quilts I used old cotton towels for batting.
I used warm and natural batting, just because it seems to get mentioned a lot by other quilters.
If I’m honest, the quilt turned out thinner than I thought it would be. But maybe that’s because of all the heavy quilting (see below!)!
I’ve got two more types of batting that I’ve ordered to try for my next quilts. What kind is your favourite?
Thread Choice
I struggled with what thread to use for the quilting. I briefly considered changing thread depending on which colour fabric I was quilting on but then I realised that would make a fairly strange multicoloured mess on the back.
So in the end I opted for a light aqua colour on top (there is a bit of that colour in the floral print fabric) and white for the bobbin.
Covering up Mistakes
When I went to quilt my scrappy quilt, I somehow got the bottom corner of the backing sort of squished up and therefore quilted down in the wrong place!

So I ended up with an exposed corner at the very bottom where you could see the batting.
I could have picked out all my quilting stitches but frankly I just wasn’t prepared to do that.
So instead I made a quilt label to cover the biggest exposed corner and hand sewed it down along with another white strip of fabric to cover the small area at the bottom that was also exposed.
Walking Foot & Free Motion Quilting Choices
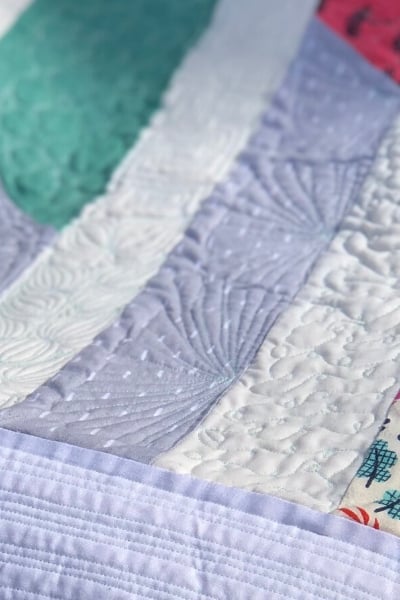
I had intended to doing a simple quilting design! But I ended up with quilting that was about as scrappy as the rest of the quilt!
I wanted to practice both my walking foot quilting and free motion quilting.
I knew for the border I wanted to do a pattern of straight lines with my walking foot. I did two close lines (roughly 1/4″) followed by a larger space (probably about a half inch), followed by 3 close lines I then repeated that sequence all the way across the border. I’m pretty happy with how that turned out.
For the middle I was going to do free motion quilting, but I didn’t plan it out ahead of time as I was so eager to get started!
I started doing a stipple type design on one of the strips but I unconsciously started using the seams of the coloured strip as a boundary. I realised pretty quick that that had been the wrong choice because I then felt like it would look odd to have one design so contained and then switch to an all over design that would cross seam lines.
So….I ended up doing a different design in each section!

The long and short of it is that I made far too much work for myself and ended up really over-quilting this.
It’s all in the name of practice though so I’m telling myself it wasn’t wasted time!
I can also now use this quilt as a reference for all the different designs I’ve tried and to remind myself which ones I liked best.
My favourites I think – in terms of how they looked at the end – was an art deco fan type design; a sort of random point to point triange-ish grid pattern; and the really basic loop the loop pattern.


I think next time though, I’m gonna put a little post-it note up on my machine that says, “less is more”. Any one of those designs would have looked so much more effective on their own!
Scrappy Binding
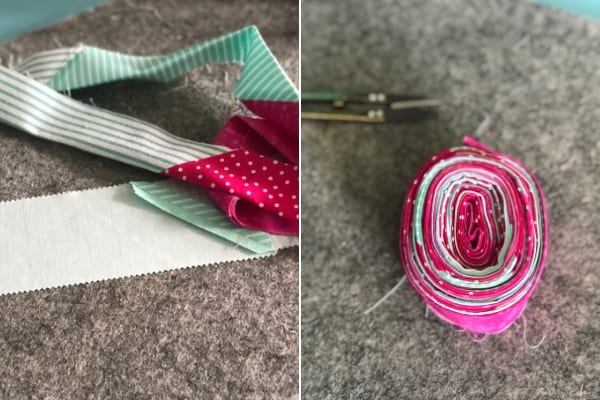
In the spirit of my binding inspired quilt I also made my first ever scrappy binding for it.
I used this tutorial from A Quilting Life.


I cut coordinating leftover strips into roughly 9″-11″ strips and joined them at that 45 degree angle like you do with regular binding – just a lot more joins!
I spent quite a bit of time laying out different scraps to find colours that coordinated with my quilt – making the binding took a while but I really love how it turned out and I’ll definitely be doing it again!
The binding might even be my favourite part of this quilt!
First time washing a Quilt
This quilt marked another first for me.
Washing a quilt!
I haven’t yet braved it with my first two but I figured this was the perfect test quilt to see if my colours would run in the wash!

I used two colour catchers and the quilt came out just fine. There was a bit of pink on one of the colour catchers so I do think they were worth using.

It even dried super quickly outside I thought. A lot quicker than I had expected given it’s 3 layers!
Finished Quilt


My kids are super in love with this quilt, they love playing underneath it, they’ve never seen one this big before!
It finished at 54″ x 70″ – a nice cuddle up size.
This is definitely my favourite quilt I’ve made so far despite all the flaws I can see in it – I love it for the colours and for the size of it.
It obviously took longer, but it just feels so much more like I’m going to use it, whereas the other two, I’m kind of a bit stumped.
What do you do with a baby quilt when your babies are toddling?
And a lap quilt? I guess you put it over your lap, given the term but my one at least doesn’t feel big enough to really cuddle up with on the sofa.
What’s your favourite size quilt to make?

The next quilt I’m doing (which I’ve already started!) is part of the Patchwork & Poodles Inkling Quilt Along.
I’ve decided to make it out of old jeans and a few of my husband’s old shirts.
You can follow my quilting along progress on instagram and I’ll be putting a post up on our sister blog Upcycle My Stuff when it’s finished as it is all about using upcycled clothing.
If you liked this post and you want to save it for later don’t forget to Pin it!

And do make sure to subscribe to my mailing list so you can stay up to date with my latest scrappy adventures!
Other posts you might like:


