How to Hang a Mug Rug (after you’ve made it!)

So you all know I have been learning to quilt. As part of that I decided I wanted a small project that I could finish quickly and feel a sense of accomplishment about.
So I decided to try a mug rug (some people call them mug mats). Which – if you’ve never heard of them – I hadn’t until a couple weeks ago! – is basically a super mini quilt that is about the right size for a coffee and a biscuit or something – like 6″ x 9″ or thereabouts.
Only thing is I don’t think I would actually use a mug rug myself. And I couldn’t think of anyone else in my life who wouldn’t be like ‘umm…a little quilt to put my coffee on? A big coaster then?’ So in the end what I decided to do was find a mug rug pattern but to hang as a little wall hanging.

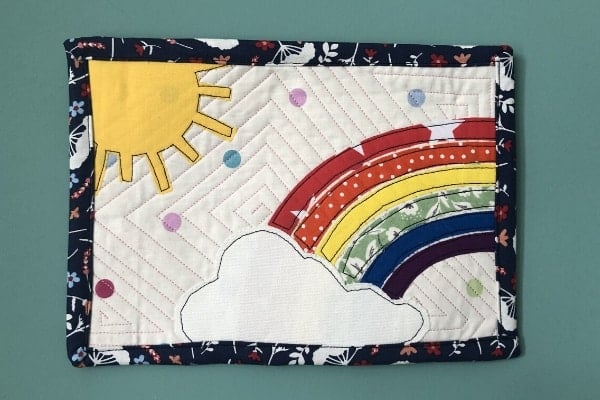
I found this Sunshine and Rainbow Applique pattern by Ameroonie Designs and I decided it would be a nice little momento gift to both of my sons to mark this crazy covid-19 lockdown phase in our lives.
It also gave me a chance to try raw edge applique which I haven’t actually done before!
The one above is the one I made for my older son (he’s 3) and the one below is the one I made for my youngest (he’s 19 months). As you can see they are pretty similar as I used the same binding and also a lot of the same scraps for the rainbow and the sun.
I altered the background fabric based on the leftover bits of fabric I had and I experimented with two different walking foot quilting designs too.
This post contains affiliate links – please see my disclosure policy for more details.
But here is the thing…I didn’t bother googling how to hang a mug rug or a mini quilt until after I had finished making them! Whoops!
Because, if you don’t already know, the two main ways people talk about hanging mini-quilts (with little corners or a pocket or loops for a dowel) are both done before you bind them!
That was a bit disappointing as I had no intention of unpicking the binding I’d just finished!
So I came up with my own after-the-fact mug rug hanging solution.
I thought I would share it here as it could also be helpful to you if you have been the recipient of a mug rug and you’d rather hang it on your wall to look at then put your coffee on it and risk spilling on it!
So here is what I did:
Hidden Hanging Loops & Buttons

I took two leftover pieces of binding strip – 2.5″ wide.

I folded them right sides together and sewed lengthways.

I then used a safety pin and chopstick to turn my inside out fabric tubes right side out.
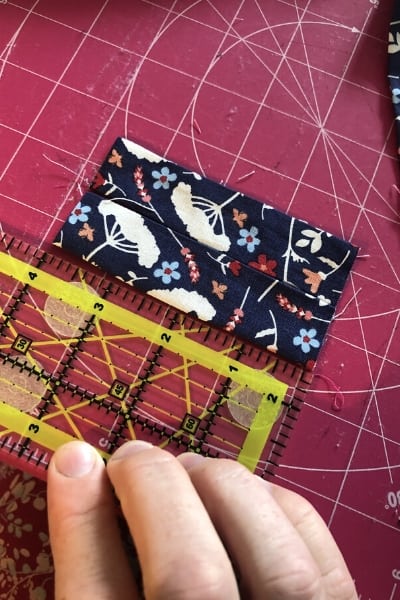
I cut the strips into 2 4″ pieces per mug rug. So I had made two mug rugs, so I cut 4 strips of 4″ long.

I then folded each strip in half to create a loop and used my sewing machine’s button foot to create a button hole about half way down each loop. Don’t judge! – I’ve never used my button foot before so that was a learning moment for me too!
Lastly, I hand sewed buttons on the back of my mug rug.
Mug Rug with Hanging Loops

I was then able to attach my hanging loops to my mug rug with the buttons.
I used some chopsticks that were lying unused in my cutlery drawer in place of a dowel and then used that to hang the mug rugs on a nail on the wall.
Easy Peasy!
The two good parts about this method – besides being able to do it after the fact – are that a) you can take the loops off if you want at any time and just snip the buttons off and it’s back to how you started; and b) if you place your buttons correctly you can hide the dowel or chopstick so that the hanging element is completely hidden.

I was seriously so pleased with myself for figuring out a workaround after I kept googling how to do it and all I got was tutorials on how to add the hanging during the making process.
I will go back and look at those ones for the next time I try something like this of course! But for these ones, my ‘make it work’ solution is working just fine.


If you liked this post and you want to return to it later, don’t forget to Pin it!


Hi Kristen, well done for coming up with this solution! You can also add a narrow hanging sleeve on the back after your have done your binding, too, for a wire quilt hanger or piece of doweling, if you want.
Thanks for the tip!
Glad it was useful!