Modern Quilt-As-You-Go Scrappy Coasters
In this post, I’ll show you how to make some cute coasters out of your scrap fabric.
These simple coasters make great gifts and they are super fun to make. They are a great scrap buster for using up your leftover fabrics after a project, or just to make a dent in your existing scrap bin.

You can make a set of 6 or 8 in an evening on your sewing machine, and they can be customized to whatever size you like.
I color-grouped my coasters, this time in shades of grey (not quite 50 of them though!) because the quilted coasters I made were a special request from my sister, who isn’t a fan of bright colors.
I couldn’t resist making one brighter-colored one for myself though!
The best thing about these coasters is they can’t break and they don’t clink or make noise on your table. You can also wash them if you get any spills!
Table of contents
Supply List
This post contains affiliate links – please see my disclosure policy for more details.
- Quilt Batting Scraps – most of my coasters were 5″ x 5″ but I made some larger ones too. Your finished coaster size will be half an inch smaller than your batting size to account for the seams.
- Scrap fabric – you will need smaller scraps for the center to start with and some fabric strips that are at least the length of your batting to finish. A 1″ or wider for your scraps and strips would be ideal for this project.
- Backing fabric – this should be cut to the same size as your batting square.
- Coordinating thread – pick a bold standout color or match your scraps and have the thread blend in.
Below are the written instructions but there is also a video tutorial if you prefer: scroll down past the instructions to watch it instead. Happy sewing!
How To Make Quilt-As-You-Go Coasters
Step 1: Pick a starting scrap
For these diy fabric coasters, all you need to start is a fabric piece with straight edges for the center of the coaster (or the “starting point” if you want to make them off-center! Read on for more explanation).
It can be any shape – a triangle, a square, a hexagon, a trapezoid….anything with straight sides.
I love to upcycle fabric scraps to create new things. You can learn how to make fabric from your scraps or use your scraps to create something entirely new like these cute coasters.

You can decide how big you want your starting scraps to be. I think mine were between 1″ and 2.5″ wide all around in general.
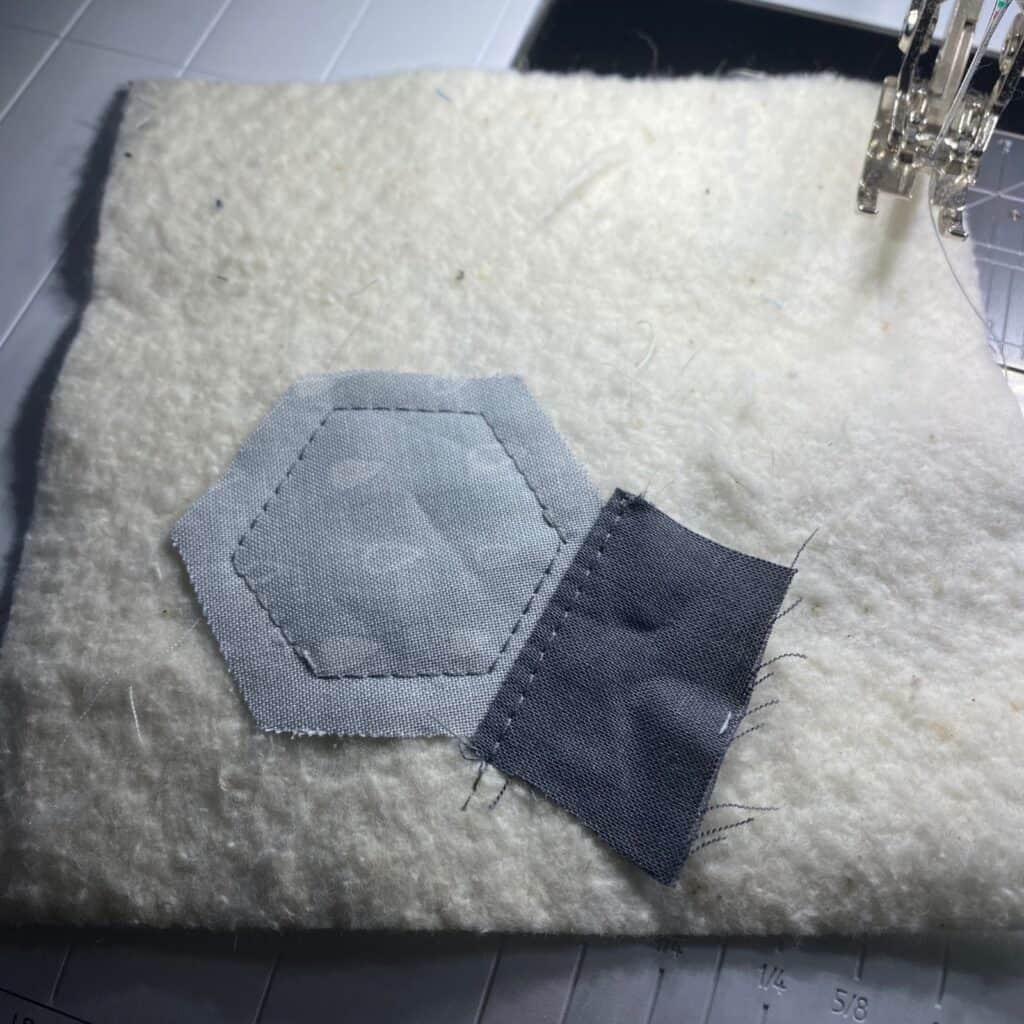
The one pictured above was actually two scraps that were already joined that had been trimmed off of something. That’s why it looks like two pieces. But for the purpose of this tutorial, just look at it as one piece.
Place your starting scrap somewhere on your batting piece.
I did some in the middle and some off-center to the bottom. Both ways look modern and striking, so don’t think too much about it, just put it somewhere.
Next set your stitch length to the length you like for quilting. I usually use a 3 or 3.5 stitch length for this.
Quilt the first scrap down using straight lines, wavy lines, or something a bit more free-form.
You want to quilt it enough that it is fixed in place, but leave some space at the edges to join the subsequent pieces of fabric.
Step 2: Quilt As You Go adding more Scraps
Next, you’ll be adding scraps to each side of this first scrap in turn.

Find a scrap that is slightly longer than one straight edge of your first scrap. Place it right sides together and sew in place along the raw edge with a 1/4″ seam allowance.
Use your regular piecing stitch length for this, not the larger quilting stitch length.
(I usually go down to a 2, but I forgot to in the photo above. Don’t stress if that happens but it’s best to shorten it for joining).

Then flip that scrap over so the right side is facing up and finger press along the seam.
If this new piece you just sewed on is much longer than the first piece, use your scissors to trim off any excess before you quilt it down in the same manner as the first scrap. This makes sure you have less bulk as you go around.

Repeat the steps above around all the sides of your first scrap, but each time you need to extend the next scrap to cover the entire raw edge of the next straight line.
So, scrap 3 will be sewn across the joined edge of both scraps 1 and 2.
Continue to go around and around in this way, joining and quilting as you go, until you have covered your batting square.

Below are some images of how to do this for a shape with more sides like a hexagon. It’s exactly the same method, just more times because there are more straight sides.


Step 3: Trimming
Trim off the excess scraps that may be hanging over the edge of your batting square.
Step 4: Attach your backing fabric
Nearly finished now!

Take a piece of backing fabric that is the same size as your finished coaster top and place them right sides together.
Sew all the way around with a quarter-inch seam allowance, leaving a 2″-3″ gap for turning.
Trim the corners and any excess in the seams to make it easier to turn right sides out and get crisp corners.
Step 5: Top Stitching your Coaster
Turn your coaster right side out using your turning gap, and use a blunt but pointy object (a chopstick or the end of a slim paintbrush) to push your corners out.

Press your coaster with your iron while turning in the raw edges of your turning gap.
Using your quilting stitch length, top stitch your coaster shut as close to the edge as possible.
Take your time and go slowly around the corners.
I find a great way is to take one stitch across each corner (giving it a bit of a blunt corner) in order to stay to the edge of the next side of the coaster.
These are my finished coasters for my sister plus the one for me (the bright one of course!)
Finished Quilted Coasters!


The one above was the first one I did. I didn’t quilt down the center first and I decided I didn’t like it as much, so the subsequent ones got quilted down in the center to start.


This is a much simpler version of these coasters using just strips all the way along.
If you aren’t sure how to do it, check out this post about my quilted wall hanging that uses the technique on a larger scale. Then come back here and follow the directions for turning and topstitching.


I hope you enjoyed this scrappy coaster tutorial and you’ve been inspired to make your own handmade coasters for yourself or someone else.
Don’t forget to subscribe to get all the latest projects to your inbox!
Video Tutorial: Quilt As You Go Coasters from Scraps
Printable Instructions

Quilt-As-You-Go Scrappy Coasters Tutorial
Make these quick scrap busting coasters quilt as you go style using your scrap fabric and scrap batting.
Materials
- Batting Scraps - mine were mostly 5" x 5" but I made a few larger too - they can also be rectangle shaped if you like
- Fabric Scraps - some longer strips some smaller scraps - roughly 1"-2.5" wide
- Backing Fabric
- Coordinating Thread
Tools
- Sewing Machine
- Rotary Cutter
- Chopstick or Other pointy blunt object
Instructions
- Place your first scrap of fabric in the center of your batting piece.
- Quilt down using straight lines or your preferred quilting design
- Place a second scrap right sides to right sides along one straight edge of your first piece. Make sure it is at least as long as that raw edge.
- Sew with a quarter inch seam allowance, then flip and finger press open.
- Quilt down this second piece as you did the first and repeat steps 1 -5 around and around until you have covered your batting piece.
- Trim off any excess scraps to the size of your batting piece.
- Sew your backing fabric down right sides to right sides with your coaster top leaving a 2"-3" turning gap.
- Turn your coaster right side out and poke the corners with a blunt pointy object like a chopstick or a pen end.
- Turn in the raw edges of your turning gap and press your coaster flat.
- Topstitch your coaster closed as near to the edge as you can get.
- Your DIY Fabric Coaster is finished!
Top Tips
- Don’t be scared to use a range of different fabric scraps for your coaster patterns. You can use bright colors, neutrals, and/or fun prints, whatever your personal preference is.
- You can piece your backing fabric from two or more pieces if you want to go extra scrappy.
- Whether you are going with a group of coordinating fabrics or going totally random, I find it looks best if you alternate light fabric with darker fabric where possible.
- You could even size this up and make matching placemats or a mini quilt!
FAQs
The ideal batting needs to be heatproof and stable, so not too thick. Dense batting made of 100% cotton would be ideal, as it will absorb any spills and protect the surface you put the coaster on.
That said I have used all kinds of batting for these from polyester to 80/20. If you want to make extra sure they will protect your table you could add in some insul bright (the stuff you put in hot plates and oven mitts).
Cotton coasters work great at protecting tables by absorbing moisture. Using dense batting also makes them heat resistant.
Linen is also a great choice as it is easy to clean and durable. Both cotton and linen coasters can be machine-washed at a cool temperature.
Fabric coasters are also great for families with kids and pets as they can’t break if they get knocked off the table!
The standard coaster size in the US is about 4 inches. But since these are handmade it’s up to you how big or small you make them. I made mine to be 5″x 5″ but I made some larger ones too.
Remember that your finished coaster size will be half an inch smaller than your batting size to account for the seams.


