Hexagon Log Cabin Quilt Block – Easy Tutorial
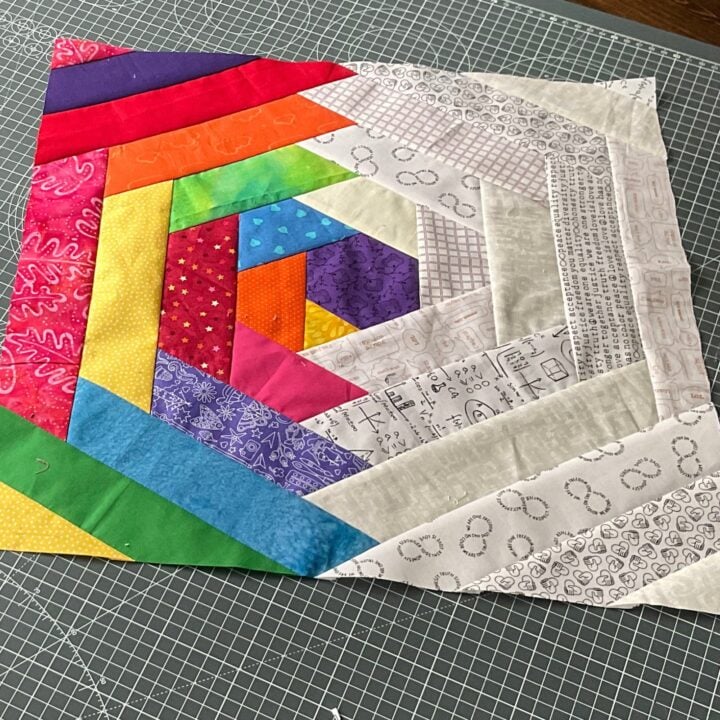
This hexagon log cabin block is a variation on a traditional log cabin block.
You can use your 2.5″ strips of fabric from jelly rolls for most of the block with minimal measuring or precise cutting.

You can make this block any size but the size of fabric strips we are using lends itself to making bigger blocks. I made mine 18.5″ square.
There are no y seams or partial seams in this block so it is definitely beginner friendly!
Table of Contents
Hexagon Log Cabin Block – Supply List
This post contains affiliate links – please see my disclosure policy for more details.
- A hexagon template to cut your starting hexie (see instructions below for more details).
- 2.5″ wide fabric strips in a background color and one or more accent colors. Strips between 5″ and 10″ in length are ideal but you can cut down longer strips as we go so no need to pre-cut.
- Rotary cutter and a straight ruler.
- Square quilting ruler to the size of your desired finished block (optional)
Note: If you want to make this block with different widths of random-sized scraps try the more improv-style quilt block for a scrappy hexagon log cabin here.
How to make a Hexagon Log Cabin Block
All my quilt blocks have as little measuring and pre-cutting as possible so apart from making sure we have a pile of 2.5″ strips the only pre-cutting needed is your starting hexagon.
Step 1: Cut a Small Hexagon
Use any hexagon template you have to hand to cut your starting hexie.

I used an accuquilt cutting die for this block and I chose the hexagon with a 2″ side.
You can also use an acrylic hexagon template or even english paper piecing templates to get your starting hexagon.
It doesn’t matter hugely what size you start with but if you go too big the log cabin effect will be lost unless you also make a huge block.
The 2″ sided hexagon was used in this case for an 18.5″ square block. Yours can be trimmed down smaller or you can make it larger (see below).
Your hexagon can be the same color as your background fabric, your accent fabric or another color altogether such as the red starting squares for traditional log cabin quilts.
Step 2: Sort your Fabric Strips
Sort your 2.5″ fabric strips into two piles – one for your background fabric color (usually light fabrics) and one for your accent color (s) (dark fabrics).
I cut mine with my accuquilt cutter but you can also use leftover jelly roll strips or cut down your scraps.

The example block in this post uses a range of low-volume fabrics for the background color and rainbow colors for the accent colors but I have also made versions in the past with just one accent color.
Making your fabric choices somewhat scrappy (even if it is within the same color family) makes this block a great way to use up leftover fabric scraps from other projects.
The only important thing here is that the two piles are of contrasting fabric so that you can see the log cabin effect in your block when you are done!
Step 3: Sewing & Trimming

Take your hexagon and one accent color strip of approximately 5″ in length (or at least an inch longer than the sides of your starting hexagon) and sew your first seam right side to right side along one side of your hexagon using a 1/4″ seam allowance.
Set your seam and press (I use my iron after ever step but you can also finger press this).
Take a straight quilting ruler and line it up along the next side of the hexagon.
Trim away the excess of your strip. Do this on both sides adjacent to your first seam (see video below if you need more of a visual for this).
For this first strip you will end up with something that looks like a triangle.
Line your ruler up on the seam line you just sewed and trim the triangle at 2.25″ (you may only be trimming a teeny bit here).

For the next seam, take a second accent strip or dark strip and sew rights together moving around the hexagon and crossing the seam you just sewed. Make sure your accent strip is longer on both ends than the shape you are now sewing too.
Repeat pressing and trimming as pictured.

Repeat until you have sewn 3 accent strips to your hexagon.

Then repeat the steps above with 3 background color strips.

Then return to 3 accent color strips and repeat the pattern until your block measures the size of the final block you want to make in at least one direction (i.e. across the middle of the block).


Note: Save your scraps from trimming the ends of the strip each time to make coordinating crumb quilt blocks.

Step 4: Sewing the Corners

If you have a square quilting ruler that is the same size or larger than your desired quilt block size use it to check your progress and see how much more you need to sew before trimming your block to a square.

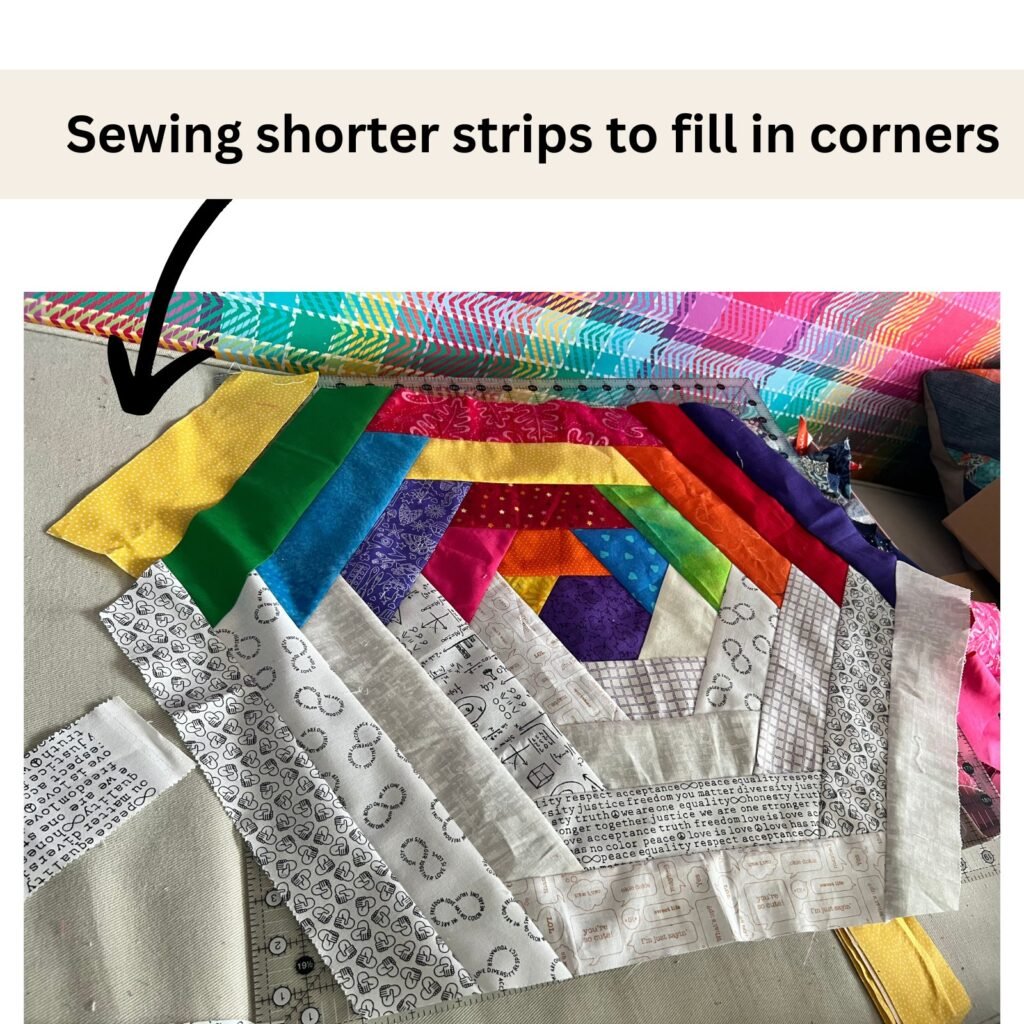
When you can see you only have the corners to fill you can repeat your fabric pattern around your hexagon but only sew shorter strips on those 4 corner sides rather than continuing the pattern all the way around.
See the video below for a clearer explanation if needed.
Step 5: Trimming your Block
Once you can see with your quilting ruler or using the measurements on your cutting mat that your block is larger than the finished size desired you are ready to trim.

If you want a more uniform-looking block be sure to center your starting hexagon in the middle of your block before trimming.
I like a more improv look so I rarely take the time to center – I just make sure all four corners of my ruler are covered by fabric and trim!
Video Tutorial – Starts at Timestamp 13:26
This large log cabin hexagon block was created as part of a Scrap Blocks Quilt Along on my YouTube channel.
The tutorial for this block is at the 13:26 mark in the video below.
Printable Hexagon Log Cabin Quilt Block Cheat Sheet

Hexagon Log Cabin Quilt Block
Easy step-by-step tutorial for a hexagon log cabin block with minimal cutting and measuring.
Materials
- Hexagon Template (approx 2"-2.5" sides)
- 2.5" Fabric Strips
Tools
- Rotary Cutter and Cutting Mat
- Square Quilting Ruler (optional)
Instructions
- Cut a hexagon using your chosen template (2"-2.5" sides is ideal).
- Sew your first 2.5" strip to one side of your hexagon right sides together.
- Trim as shown in photos above.
- Sew your second 2.5" strip to the next side of the hexagon crossing the seam you just sewed.
- Trim as shown.
- Repeat using 3 color (or accent) strips followed by 3 background (or light color) strips in turn.
- Repeat this color sequence sewing and trimming until your block measures the size of your desired finished square block when measured across the center.
- Sew shorter strips to each corner following the color pattern until the full area for the block is covered.
- Trim to size.
I hope you enjoyed this tutorial and have enjoy adding your quilt blocks to a beautiful quilt, or quilt up one block and make a hot pad! Have fun with it!
More Posts you Might Enjoy:
- Scrappy Hexagon Quilt Block – No Measuring!
- AccuQuilt Go! Fabric Cutter Review (2023)
- Scrap Burst Quilt Block – FREE Foundation Paper Piecing Pattern
- Improv Braided Quilt Block – Use your Scraps!
- Framed Scraps Quilt Block – for Precious Fabric Scraps!
- Fun Christmas Tree Quilt Block – For Crumbs & Scraps!
- Fun Denim Quilt Blocks (Use your binding scraps for these QAYG Blocks!)
- Mini Flying Geese Free Foundation Paper Piecing Pattern & Tutorial


