Easy Quilt Block Pattern for 2.5″ Strips
This is a fun and easy quilt block pattern for quilters of all skill levels.
It’s quick to put together and perfectly sized for using up 2.5″ squares and 2.5″ jelly roll strips.
We all end up with that odd leftover fabric strips from jelly roll bundles or the ends of unused quilt binding cut to 2.5″ as well as mini charm squares. This block makes good use of them all.
This stepped quilt block which I just call a ‘Rectangles & Squares Block’ I’m sure has other names but at it’s heart are just some simple rectangles and squares.
Below you will find step-by-step instructions to make this easy peasy & super versatile quilt block – perfect for a beginner quilter.
Table of Contents
Rectangles & Squares Quilt Block – Fabric Requirements
This post contains affiliate links – please see my disclosure policy for more details.
Note: These measurements will yield an 8.5″ quilt block.
- From your Background Fabric cut (2) 4.5″ x 2.5″ Rectangles; and (2) 2.5″ x 2.5″ squares.
- From Accent Fabric 1 cut (2) 4.5″ x 2.5″ Rectangles; and (2) 2.5″ x 2.5″ squares.
- From Accent Fabric 2 cut (4) 2.5″ x 2.5″ squares.
How to Make the Rectangles & Squares Quilt Block
You can make this block as scrappy as you like but to keep things simple I have gone for two accent fabrics and one background fabric.
If you are making this as a scrap buster it can be helpful to make two piles, one with dark strips and one with light strips to pull from for the background and accent colors respectively.
I didn’t have a huge contrast for my Accent colors 1 & 2 but you could go with two totally different colors depending on the colors of your own strips.
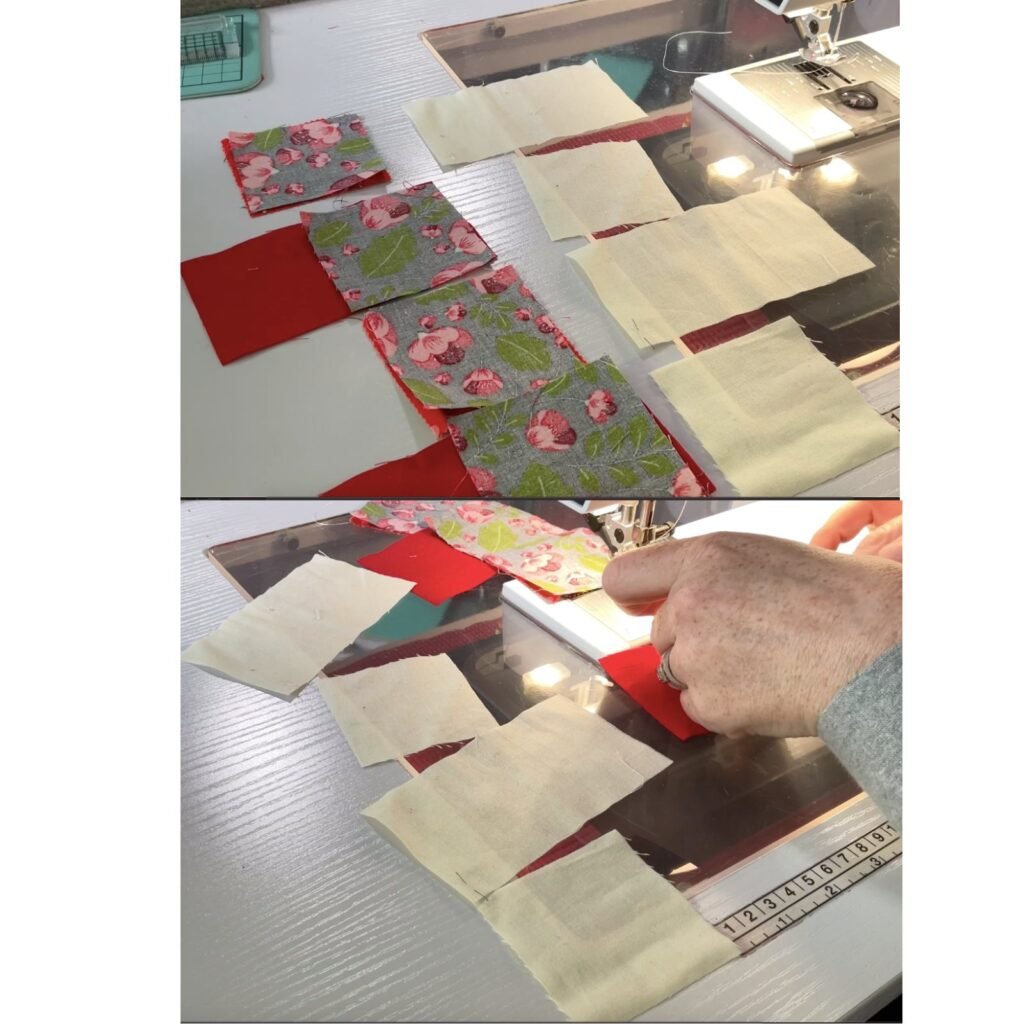
Step 1: Lay out patches as shown
Cut and arrange your fabric patches as shown (the red in this photo is accent fabric 1; flower fabric is accent fabric 2; and the cream fabric is the background fabric).

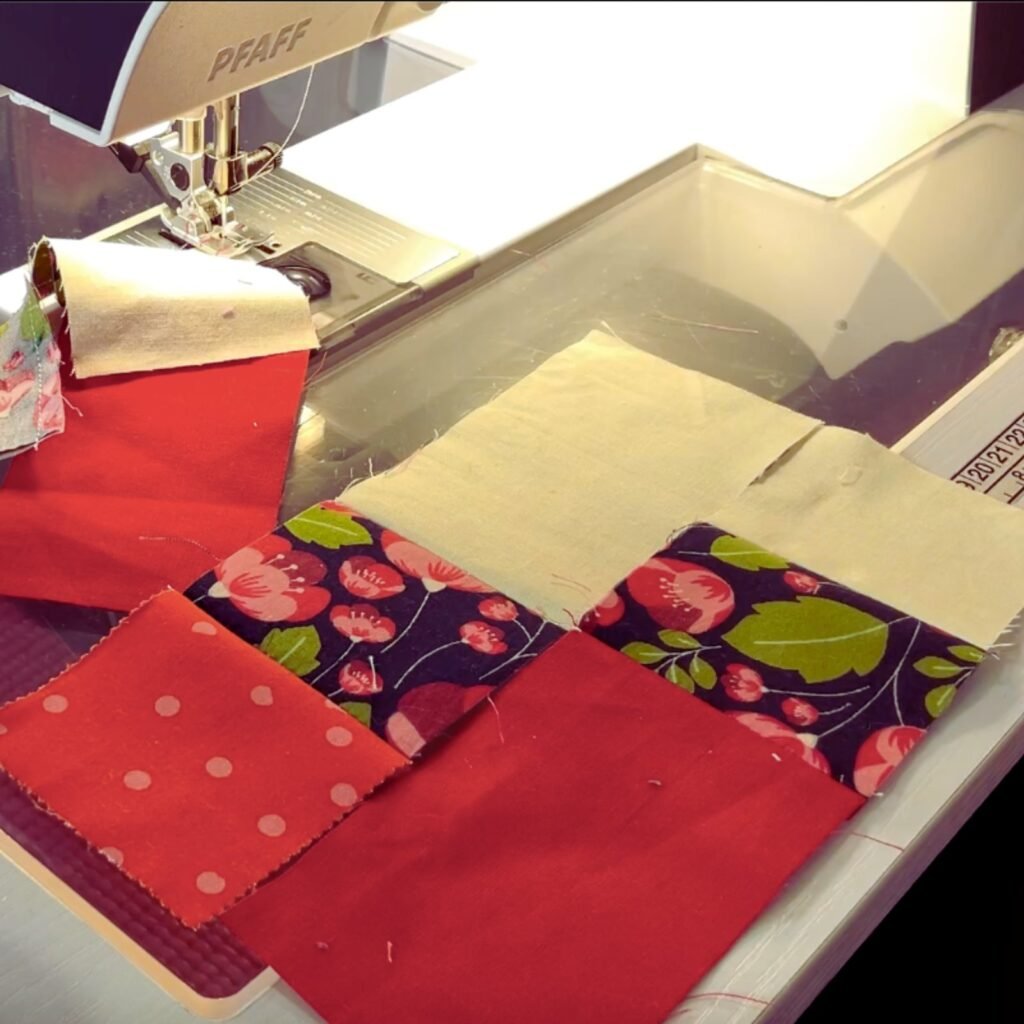
Step 2: Chain Piece
Place accent fabric 2 right sides together with accent fabric 1 and use a quarter-inch seam allowance to join along the right side of accent fabric 1.

Chain piece all 4 sets of patches through your machine one after the other without cutting your thread.
Keep your background fabric patches in order close to your machine so you can add them next.
Clip each accent fabric unit from the back of your chain and add your background fabric right sides together to accent fabric 2 and continue sewing with your quarter-inch seam until you have 4 ‘rows’ or block units that will be joined to make your final quilt block.


Step 3: Join Rows to Complete the Quilt Block
Once you have 4 rows, sew right sides together in sets of 2 following the layout in the fabric requirements image above.
For each pair there will only be one seam to match where the accent 2 fabrics meet each other.
I like to press seams open but you can also nest your seams if desired.

Finally join the two halves of your block as shown again matching the seams of the accent fabric 2 squares.

Finished Rectangles & Squares Quilt Block
Here is the finished block. I think this block would be great for a wide quilt border or done in rows as an easy baby quilt with minimal seams to match.
You can get such a variety of patterns with this block depending on the fabric you use and how you orient your block.

This size block is great for using up precut fabric as 2.5″ is such a common size. However, I have also made a larger version (see below).
Foundation Paper Pieced Version
Here are some other examples of blocks using this pattern done in some rainbow colors for my Scrap Blocks Quilt Along quilt.

These blocks are slightly larger (9.5″ block) and were pieced using foundation paper piecing.
To get the free foundation paper piecing pattern for this you can sign up to the quilt along here (you can get the free emails for each block even if you sign up after the quilt along is over!).
Printable Cheat Sheet

Easy Quilt Block for 2.5" Strips
Make a simple quilt block from rectangles and squares. Perfect for using up 2.5" strips and 2.5" mini charm pack squares.
Materials
- Background Fabric - (2) 4.5" x 2.5" Rectangles; (2) 2.5" x 2.5" Squares
- Accent Fabric 1 - (2) 4.5" x 2.5" Rectangles; (2) 2.5" x 2.5" Squares
- Accent Fabric 2 - (4) 2.5" x 2.5" Squares
Tools
- Sewing Machine
- Rotary Cutter
- Cutting Mat
- Iron
Instructions
- Lay out fabric patches in rows as pictured above.
- Chain piece accent fabric 2 to accent fabric 1 right sides together with a 1/4" seam.
- Chain piece background fabric to accent fabric 2 as above.
- Press quilt block unit 'rows' using your preferred method (seams open or alternating direction for each row)
- Join rows in sets of 2 matching seams where accent 2 fabrics meet.
- Join 2 halves of your block again matching seams where accent 2 fabrics meet.
- Give your block a final press and trim to 8.5"
Video Tutorial
Top Tips
- Take a photo of your patches in the correct layout before you start sewing in case you get mixed up along the way. You can refer back to it to keep you right.
- Be consistent with pressing your seams. Decide if you want to press your seams open or nest them and stick to whichever way you choose.
- Make sure there is enough contrast between your fabrics so the stepped look of the block can be seen.
Frequently Asked Questions
Yes you can! This tutorial gives you the measurements for best using your 2.5″ jelly roll fabric and 2.5″squares but this block would also look great smaller strips or larger ones.
The foundation paper pieced version in the second half of the video tutorial gives the sizes for a 9.5″ block.
When altering your block size always make sure to account for that 1/4″ seam allowance in your math.
I think this block is great for ends of 2.5″ strips or even full jelly roll strips you don’t have another use for.
Other ideas for 2.5″ strips include – quilt binding; a strip quilt, rail fence quilt blocks, log cabin block, and jelly roll race quilts.
This is a super quick block – you can make one block from cutting to finished in less than a half an hour which makes it a super easy quilt pattern.
Cutting for multiple blocks at a time can be a great time saver and if you chain piece all your units for multiple blocks you can certainly go quicker!
Yes you could make strip sets for the smaller units of 2.5″ squares (there is a set of 2.5″ squares next to each other in each row of the block).
To do this you would use long strips of fabric – for example an entire jelly roll strip – in two pairs: Accent Fabric 1 & Accent Fabric 2; and Accent Fabric 2 & your Background Color.
You would then sub-cut units into 2.5″ x 4.5″ rectangles and join them to the other rectangles in the block.
More Quilt Blocks You Might Enjoy
I hope you have enjoyed this free pattern. Below you will find links to more fun scrap fabric quilt blocks and beginner quilt patterns with step-by-step tutorials.
- Foundation Paper Piecing Quilt Patterns FREE – Scrap Burst Quilt Block
- Hexagon Log Cabin Quilt Block – Easy Tutorial
- Framed Scraps Quilt Block – for Precious Fabric Scraps!
- Fun Christmas Tree Quilt Block – For Crumbs & Scraps!
- Crumb Quilting Tutorial: No Scrap is too Small!
- Fun Denim Quilt Blocks (Use your binding scraps for these QAYG Blocks!)
- Improv Braided Quilt Block – Use your Scraps!
- Scrappy Hexagon Quilt Block – No Measuring!
- Mini Flying Geese Free Foundation Paper Piecing Pattern & Tutorial
- Free Heart Pattern – Beginner Friendly Foundation Paper Piecing
- Free Quilt Patterns For Your Scrap Fabric!
- Easy Nine-Patch Block Quilt