Scrap Buster Plus Quilt – Sew Along
This is Scrap Fabric Love’s first-ever quilt along!
This is a no-stress block-based plus quilt (or swiss cross ?) sew-along that is meant to make a serious dent in your quilting scraps!

This is a free quilt pattern and the sew-along started in January of 2023.
Seeing this after the sew-along has finished? Don’t worry the tutorial will stay live as well as the tutorial videos so you can always start your own sew-along any time.
Table of Contents
Fabric Requirements – Scrappy Plus Quilt
This post contains affiliate links – please see my disclosure policy for more details.
For this scrap-busting quilt, my challenge to you is that you use your leftover scraps from your other quilting projects instead of heading to the fabric store!
You will find options in the instruction to mix and match the center of your blocks to use up whatever size of scraps you have from crumbs to 2.5″ squares or larger pieces.
I am using mainly cotton fabric for the quilt I am making but for my test blocks I also used upcycled denim jeans for the background fabric in some blocks and that worked great too!
Fabric Requirements for one Scrappy Plus Quilt Block:
For plus signs block centers:
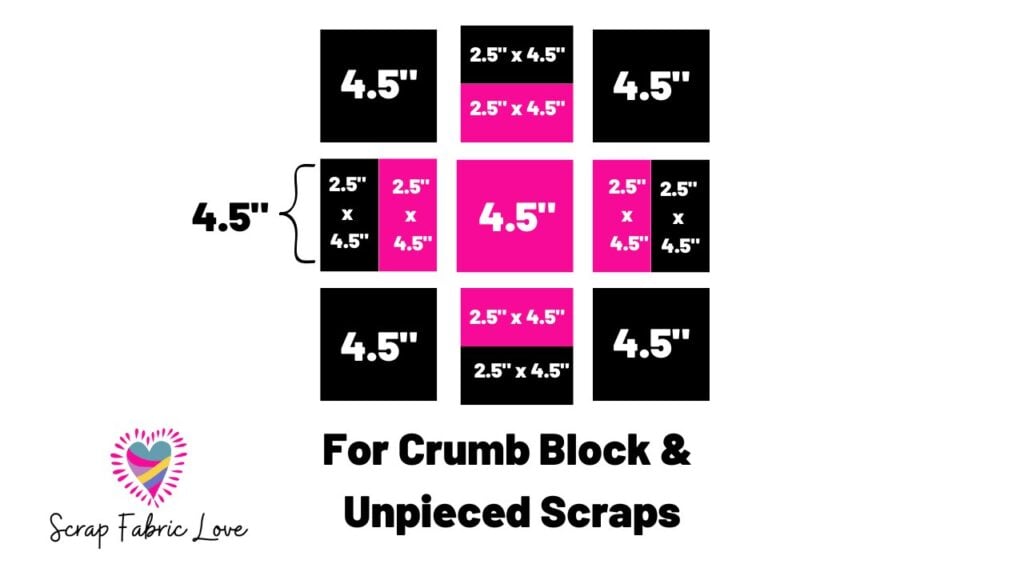
- (1) Center square 4.5″ [Can be substituted for a 4.5″ crumb block square or a 4 patch made up of (4) 2.5″ squares]
- (4) 2.5″ x 4.5″ rectangles [Can be substituted for a 2.5″ x 4.5″ crumb block or a 2 patch unit of (2) 2.5″ squares]
For background fabric:
- (4) Corner squares 4.5″
- (4) 2.5″ x 4.5″ rectangles
- Background fabric does not need to be all the same print but should be all the same color. So for example you could use a mix of low-volume fabric. For my quilt, I used a mix of solid black and black blender fabrics.


See further below for how many blocks are used for different quilt sizes.
How to Make a Scrap Busting Plus Quilt
Both the background and the plus sign quilt blocks are intended to be made from your leftover fabric scraps from your other quilting projects.
Step 1: Color Sorting
This is not essential but very helpful and it is how I approach my scraps.

I love scrap quilts but I also love modern quilts and for me, the best way to keep a scrap quilt looking modern is color sorting.
I have both my fabric crumbs and strips sorted by color as well as the rest of my fabric stash which tends to be a mix of other people’s offcuts and a little bit of yardage. I love my fabric storage system and it really helps me use more of my scraps more often.
For this quilt color sorting helps because you will want to know which color of scrap fabric you have the most of…this should be your background fabric.
My background fabric for this quilt is black (and ‘reads black’ fabric – like black on black blenders, etc). You can use whatever color you want and you can use a different background fabric for each block if you prefer – as long as it contrasts with your block center.
For the centers of your plus quilt blocks you could use all one color or have different blocks with different color centers.
When I say one color you can interpret that as different fabrics that are all blue for example, or you can get even more granular and sort into teal blue, navy blue, light blue. That is more what I do but it might be a step too far for lots of you! You do you!
Step 2: Pick your Plus Block Center
The colored center of these plus quilt blocks are what I call mix and match.
Which means you can use different types of fabric scraps interchangeably.
The measurements are all the same but if you have more crumbs you can use crumb blocks, if you cut your scraps into 2.5″ squares you can use those, or if you just have a bin of mixed-sized scraps you can cut them down to the unit sizes required.
Crumb Version:

Here is a tutorial about how to make a one-color crumb quilt block like I am using for my blocks or I also have some videos on my youtube channel about crumb quilting that might be useful.
2.5″ square version:


Scrappy leftovers version (great way to use up leftover jelly roll strips and pieces of fat quarters and fat eighths that you didn’t use all of):

Or you can do a bit of all three!


Step 3: Cut your Fabrics
See the fabric requirements above for one block.

The 2.5″ x 4.5″ rectangle units are perfect for using up leftover jelly roll strips and the 4.5″ background squares can easily be cut from a leftover layer cake square or charm packs too.
Start with whatever scraps you have and see what sizes you can come up with. Remember you can also piece scraps to make them big enough to cut a unit out of too! Consider it large crumb piecing!
Accuquilt Dies

You can use a quilting ruler and rotary cutter to cut your fabric but for this project I used my Accuquilt dies and Accuquilt Go Cutter to cut the pieces for my blocks. Here are the codes for the dies I used:
- Die 55708 – 4.5″ Square
- Die 55715 – 2.5″ x 4.5″ Rectangle (Cuts 2)
- Die 55709 – 2.5″ squares (cuts 4)
All of the dies I used were in the Accuquilt 8″ Mix and Match Qube.

As this is a scrap buster project, I suggest taking it block by block before you decide on your final quilt size, but if you would rather plan for a specific size you will find some layout ideas and block requirements in the layouts section below.
As an indication for estimating how far your fabric will stretch – you can get approximately 10 x 4.5″ squares from a fat eighth if you cut carefully.
Step 4: Sew Rectangle Blocks

Take (4) 2.5″ x 4.5″ Center Square fabrics and (4) 2.5″ x 4.5″ background fabrics.
Pair and sew right side to right side along the long edge using a 1/4″ seam allowance.

Make 4 units per block.
Press seams as desired (to one side or pressed open).
Step 5: Construct a 9 Patch Block

Sew each block in 3 rows using a 1/4″ seam allowance:


- Row 1: Background square 4.5″, Rectangle unit with center color to the bottom; 4.5″ background square
- Row 2: Rectangle unit with center color to inside; 4.5″ center color square; rectangle unit with center color to inside.
- Row 3: Background square 4.5″, Rectangle unit with center color to top; 4.5″ background square.
Sew rows together either nesting seams or with all seams pressed open.
Step 6: Trim Block to 12″ Square
Using your favorite trimming ruler (mine is a 12.5″ Square Ruler like this one), trim your block to 12″ square.

Keep the center square in your 9-patch centered (the central patch should be 4″ finished so you can line up the 4″ and 8″ lines on a square ruler like this one to keep your block centered.
Step 7: Repeat for the Number of Blocks desired

See quilt size and layout options below as well as ideas for smaller projects using less blocks.
Quilt Size & Layout Options
Below you will find an indication of how to construct a quilt top using different numbers of blocks. The sashing and borders are of course optional but give some good negative space to make your scrappy plus sign blocks really stand out.
See Video 2 in the Scrap Buster Sew Along for more details about these layouts.
| Quilt Size | # of Blocks | Sashing/Borders | Finished Size |
| Table Runner | 3 | 2.5″ border | 17″ x 41″ |
| Baby Size | 9 | 2″ Border; (2) Sashing rows of (9) 4.5″ squares | 40″ x 48″ |
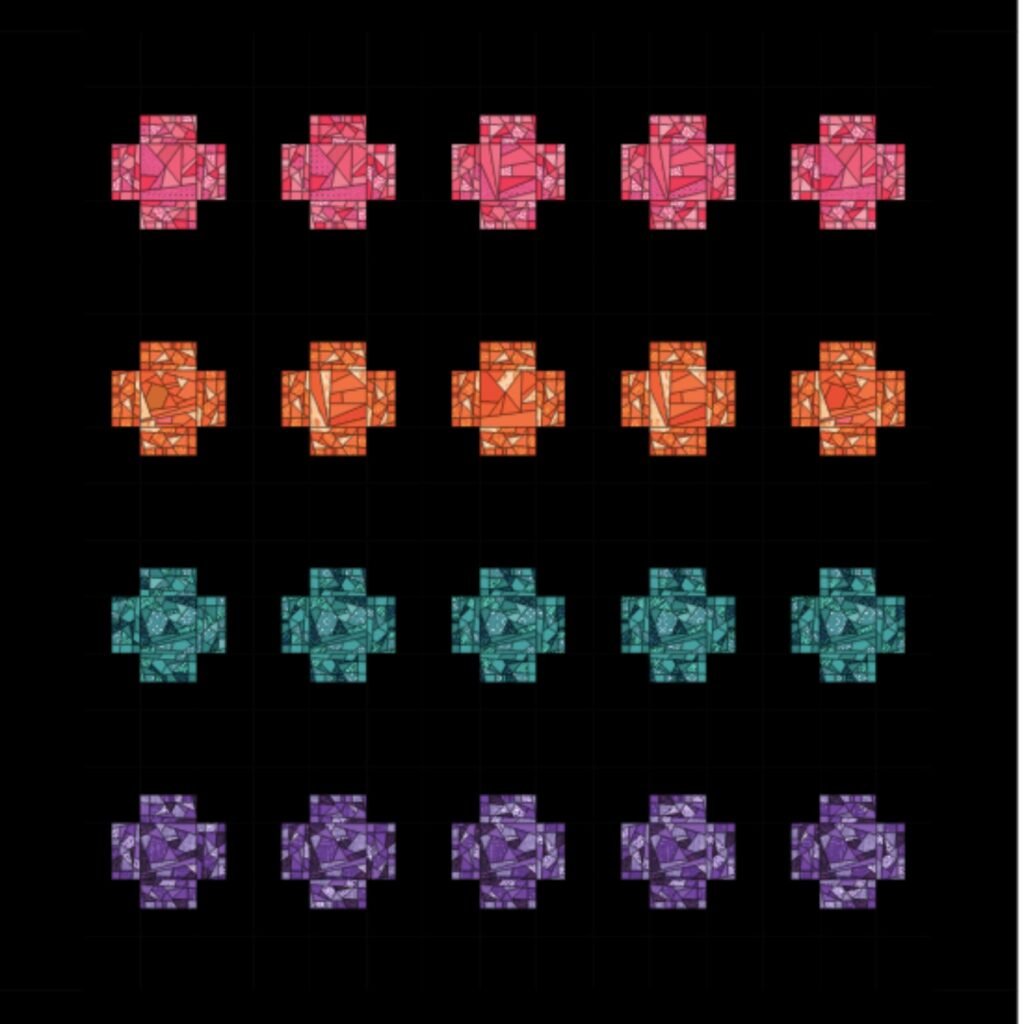
| Lap Size | 20 | 6″ Border; (4) Sashing rows made up of (15) 4.5″ squares to use up more scraps | 72″ x 80″ (or 60″ x 68″ with no border) |
| Queen Size | 30 | 5.75″ Border; (6) Sashing rows made up of (20) 4.5″ squares; (30) 4.5″squares for end of row sashing (see video for more info but also note there is a mistake in the video that says you need 222 4.5″ squares but it should read 180) | 91″ x 95″ |
Lap Size Quilt example layout using crumb block centers for the plus quilt blocks:

Table Runner Example Layout using 2.5″ center squares:

More Small Project Ideas with Scrappy Plus Quilt Blocks
The main thing I want you to get from this sew-along is a finished project. So if you use the plus quilt pattern to make some blocks but you don’t quite get enough finished to make a whole quilt top, why not use them for a smaller project like the ones below?
- Make a Hot Pad with some insul bright and batting with just 1 block and some backing fabric.
- Use 2 Blocks to make a double-sided cushion.
- Sew together 4-6 blocks to make a row of blocks and then save your row to add to later, either with more scrappy plus blocks or other orphan blocks or scrap blocks you make throughout the year.
- Sew 4 blocks into a large 4-patch shape and make a wall hanging – why not change the color of the center plus to reflect the seasons?
- Use 4 blocks. and a bottom border to make a little quilt that can be used as a stroller quilt.
Scrappy Backing Fabric

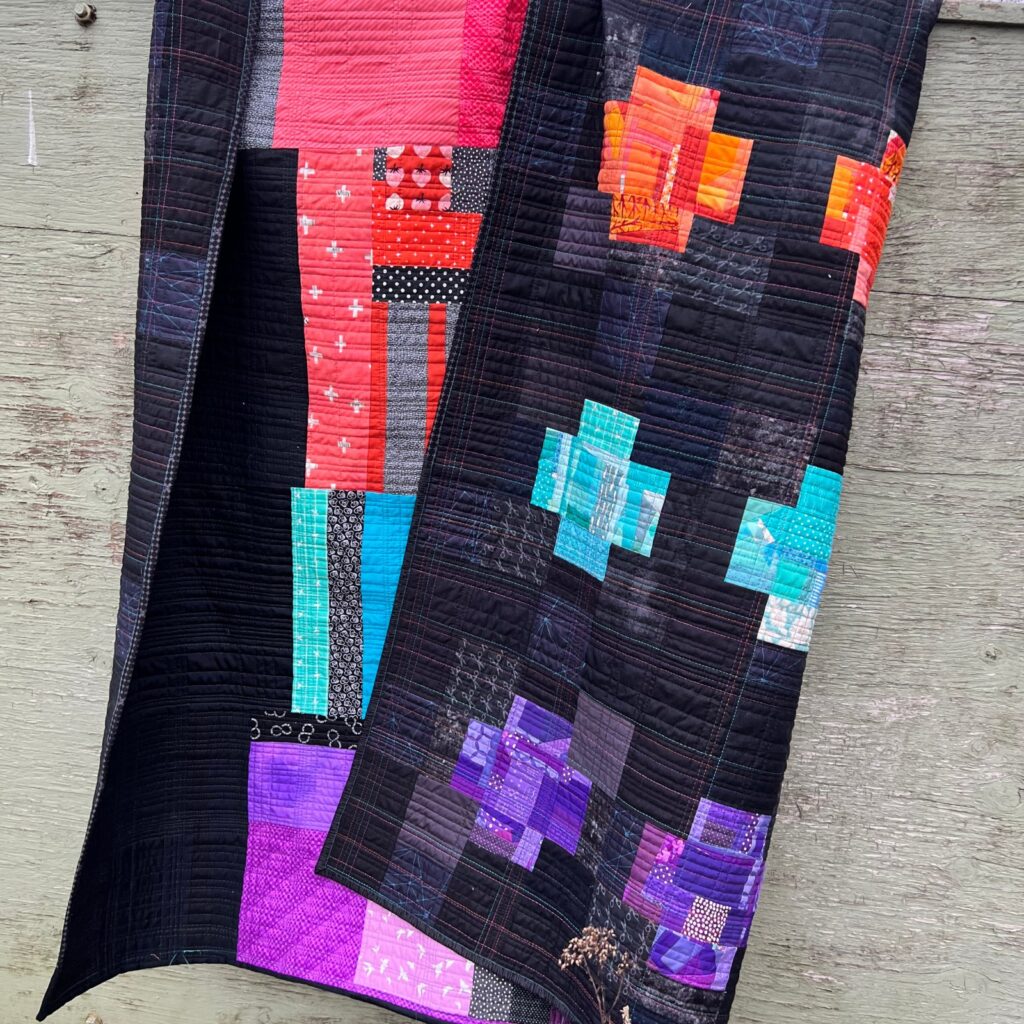
In Week Three’s video (linked to below) I showed my process for taking larger scraps in similar colors to those in my quilt top blocks and creating four long ‘rows’ to make up a super scrappy backing for my quilt.
It was basically an exercise in improv piecing with a bit of a plan.
If you are looking for more quilt-backing ideas there are tons more here:
Video Tutorials
Once live you will find links to the sew-along video tutorials in this section.
Week One Video:
Week Two Video:
Click Here (the one with ideas for layouts and different backgrounds)
Week Three Video:
Click Here (the one about quilt top construction and scrappy backing fabric)
Week Four Video:
Click Here (the one with quilting ideas for walking foot and long arm quilting)
Finishing Your Quilt
There are lots of options for how to quilt this quilt including straight lines with a walking foot, or quilting each row quilt-as-you-go.
In Video 4 of the sew-along I chatted with Tom from the Colourblind Quilter about loads of fun and easy options for quilting this quilt on a domestic sewing machine with a walking foot.

I also show you how I used channel locks on my Moxie Long Arm Machine to create a random plaid cross-hatch design.
My Finished Plus Sign Scrap Buster Quilt!
I am really pleased with how my quilt turned out.
If you want to see how other participants used the pattern to make their own unique creations you can see loads of photos in the sew-along videos or you can go to Instagram and look up #scrapfabriclovesewalong.


Top Tips
- If you like the idea of using crumb blocks but you are worried about bulky seams, just use your crumb blocks for the center square and use a standard 2.5″ x 4.5″ piece or (2) 2.5″ squares for the colored rectangles sections.
- Make color-coordinated crumb quilt blocks whenever you finish a big quilt project. Then you’ll have a stash of crumb blocks ready to go for a scrap-busting project like this!
Frequently Asked Questions
If you don’t sort your scraps by color and it feels like too much work to do start that’s fine. All you really need is to pull out the color you have the most of to make it your background fabric.
The center of your blocks can be totally scrappy and mismatched as long as they contrast well enough with your background. Example: there wouldn’t be much contrast if your background was navy blue and your scrappy centers had navy blue and some other colors in them.
However, if your centers were mixed light colors, yellows, pinks, etc there would be enough contrast to make your scraps pop.
You can also do the opposite – make your background totally scrappy and use low-volume fabrics for the plus center or ‘cross blocks’ – like the example below.
No! This quilt is designed to be mixed and matched so you can use up as many scraps as possible with as little work as possible.
Use what you already have like pre-cut 2.5″ squares or previously pieced crumb blocks to start and then add the pieces you are missing by cutting from the rest of your scraps as you make each block.

Scrap Buster Plus Sign Quilt
Make a super scrappy plus sign quilt using only your leftover scraps!
Materials
- Your Scraps: Including Crumb Blocks, 2.5" squares and other leftover fabrics
- You should have a background fabric set of scraps and one or more color coordinated piles of scraps
Tools
- Sewing Machine
Instructions
- Cut (4) 4.5" squares and (4) 2.5" x 4.5" rectangles from your background fabric per block. These can be scrappy and cut from different fabrics of the same color.
- Cut (1) 4.5" square and (4) 2.5" x 4.5" rectangles from. your focus scraps (for block center plus sign) per block. These can be straight-cut fabric or crumb blocks. [Alternatively you can use 2.5" squares for the central plus - see measurements in full written blog tutorial]
- Sew (1) 2.5" x 4.5" rectangle in your background fabric to one 2.5" x 4.5" rectangle in your plus sign scrap fabric right side to right side with a 1/4" seam allowance. Make 4 of these units per block.
- Sew a 9-patch block with background squares and rectangles to the outside and colored scraps or crumb blocks in the central plus shape.
- Repeat for as many blocks as required for your desired quilt size..
Questions?
The fastest way to get a reply from me is to comment on the youtube video about this blog post; or you can email me at [email protected].
You can also find me on instagram and facebook as @scrapfabriclove. If you want to tag me with your sewalong progress you can also use the hashtag #scrapfabriclovesewalong


2 Comments
Comments are closed.