Free Christmas Wreath Quilt Pattern
This year I made a quick and easy Christmas Wreath Quilt which can be easily adapted to lots of sizes.
Mine was a lap size quilt but this pattern would look equally nice as a wall hanging to add to your holiday decor.
To make my quilt I used the AccuQuilt Holiday Medley Fabric Cutting Die – see below for more materials needed.
Table of Contents
- Christmas Wreath Quilt – Fabric Requirements and Supplies
- Piece your Background Fabric
- Marking Out your Wreath Shape
- Quilting your Background Fabric
- Cutting the Holly Leaf & Berry Shapes
- Optional Fusible
- Raw Edge Applique Christmas Wreath
- Merry Christmas Applique Letters
- Scrappy Christmas Binding
- Finished Christmas Tree Wreath Quilt
- Top Tips
- Frequently Asked Questions
Christmas Wreath Quilt – Fabric Requirements and Supplies

This post contains affiliate links – please see my disclosure policy for more details.
- Background Fabric (mine was a mix of white on white prints) approx. 2 yards but see below description.
- Mix of Christmas Fabric and Red and Green Solids divided between (4) 3.5″ WOF strips OR a mix of scraps at least 2″ x 3.5″ in size.
- 2.5″ x 30″ Strip Dark Red Fabric for the Merry Christmas letters (optional)
- Backing Fabric – 54″ x 64″ (including longarmer excess).
- Binding Fabric (mine was pieced from Christmas Fabric scraps)
- Accuquilt Holiday Medley Fabric Cutting Die (& Accuquilt Cutter!)
- Washable Fabric Pen
- Coordinating Thread
- Batting
- Optional – iron on fusible (I didn’t use it for the holly leaves, just for the letters, but many people would find it very helpful for this – see comments below).
Piece your Background Fabric
This easy raw edge applique quilt essentially requires one big piece of background fabric.
My finished background was 50″ x 60″ but it doesn’t have to be the same fabric for the whole thing, you can piece your background from multiple pieces of fabric and even multiple prints.
I used a white-on-white fabric remnant of 48″ x 40″ for the center of my background fabric and added a solid white border of 6″ (it got trimmed down after quilting) to get it to the size I wanted.
You can also easily adapt this pattern to a smaller or larger size than the quilt I made (see the section on marking out the wreath size for more on that).
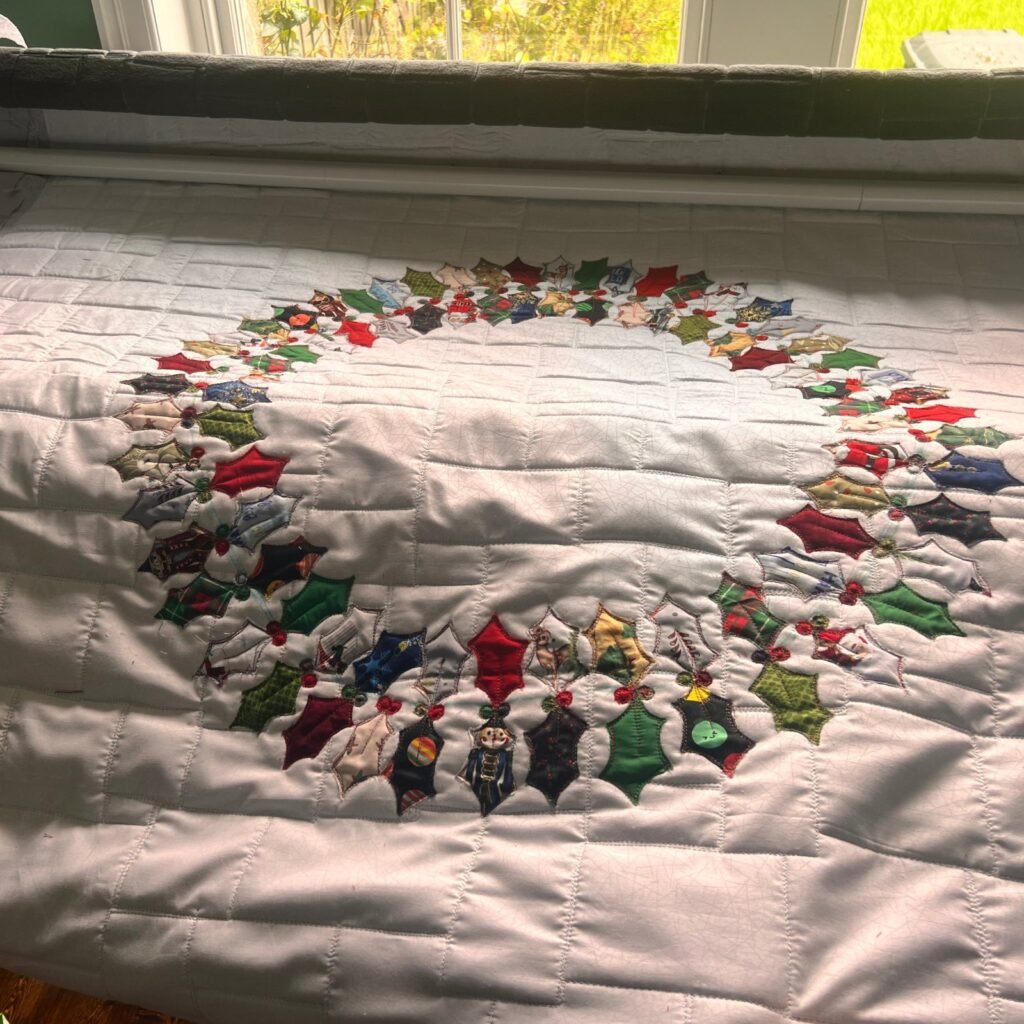
Marking Out your Wreath Shape
After my background fabric was pieced to the size I wanted I used a washable fabric pen to mark out a circle in the center of the fabric to use as a guide for stitching my wreath.

I used one of my children’s large toys (the paw patrol lookout tower in case you were wondering…) and traced a circle around that. My circle has a diameter of 22.5″ across.

As I mentioned above you can adapt this pattern to many sizes just by adjusting the size of the circle for your wreath and adjusting your background fabric size to suit.
This quilt could easily be sized down for a wall quilt or even smaller for a quilt you can hang on your front door!
My line was not ‘neat’ and it doesn’t matter if yours is, it’s a guide and it will wash away when you wash the quilt so no one will ever see the line you drew.

Other ideas for drawing your wreath circle:
- Use the pen and string method (measuring the radius you want for your circle and cutting the string to that length).
- Trace around a dinner plate (for a smaller wall hanging or placemat version)
- Trace around a circular rug, plant pot, table or anything that you can move that is the size of the circle you want!
Quilting your Background Fabric
I quilted my Christmas Wreath Quilt on my HandiQuilter Moxie Longarm, but this can absolutely be done on a domestic so don’t fret!

I decided to quilt my background fabric quilt top first using white thread and add my wreath afterward.
This is optional and you could choose to quilt everything at once if you prefer.
I used a free-hand ‘cobblestone wall’ quilting design that is basically a lot of squares and rectangles quilted over 3 or 4 times. It’s a simple and forgiving quilting design that looks to me like a stone cottage wall or something – perfect for hanging a wreath on to my mind!

For my backing fabric, I used a grey anti-pil fleece. I love a fleece quilt backing on a quilt, especially a Christmassy one!
Cutting the Holly Leaf & Berry Shapes
I used the Accuquilt Holiday Medley Die which also has Christmas Tree and Snowflake shapes to cut my holly leaves and berries. You need an AccuQuilt cutter in order to use this die, it won’t work on its own.

You can make this quilt without the Accuquilt if you have another template for your holly leaves and berries that you can trace and cut the shapes out with sharp sewing scissors.
If you don’t know what the Accuquilt fabric-cutting system is check out the links below:
I used 86 holly leaves and 92 holly berries for my lap-size Christmas Wreath Quilt.

The Christmas Fabrics for the holly leaves were part of a Christmas collaboration challenge I did with some other quilters who sent me random Christmas fat quarters. So the fabric choices weren’t entirely mine.
To make the color combo work I decided I needed to add more red and green fabrics to make sure it had that Christmas look.
Each holly leaf measures 2″ x 3.25″ and the berries are 1/2″.
The easiest way to prep your fabric ahead of time would be to cut 3.5″ inch strips adding at least 2″ to the length of your strip for each leaf you want from that strip.
So for example if you wanted all your leaves the same color and you were making the same amount as I was you would need approximately (4) WOF 3.5″ strips.
However, if you want a variety of fabrics like I used you can cut 3.5″ strips from a variety of fat quarters to add up to the same amount or you could also cut leaves from jelly roll strips.

I used fabric from 12 Christmas fat quarters and 4 additional prints/solids in red and green pulled from my stash. I was being fairly random about it and cut more leaves than I needed so there isn’t necessarily an equal number of each print on my quilt.
I had plenty of fabric left over from my fat quarters which ended up in a scrappy binding.
You can also cut your shapes from Christmas scraps of all different kinds if you have those cluttering up your sewing room!
For the holly berries, I used only my solid red and green fabric or cut-outs from the other Christmas fabric that were either red or green. Scraps are perfect for this!
Optional Fusible
Iron-on fusible products are great for applique, they hold your shapes in place so they don’t move when you are stitching them down.
I use iron on fusible products often, but for this project, I chose to skip that step and stitch the holly leaf and berry shapes on with no adhesive.
If you want to use them you should iron your fusible on the wrong side of your fabric BEFORE you cut your shapes out.
You can put fusibles through the AccuQuilt you just might want to reduce the number of layers of fabric you cut at a time, counting the fusible as another layer.
I did use a fusible iron-on for my Merry Christmas letters in the center of the wreath – more on that below.
Raw Edge Applique Christmas Wreath
I used a variegated Christmas colors thread to attach my holly leaves and berries using raw edge applique. I did this on my Moxie long arm but you could equally do this using free-motion quilting on a domestic.
I didn’t lay out my whole wreath before I started stitching.
If you have used a fusible or you have the patience to pin all your leaves and berries in place ahead of time you absolutely can plan it out.

What I did was use the circle I had drawn on my fabric as a guide and placed the tip of my holly leaves on the circle.
I stitched one leaf at a time stitching close to the edge and travelling around approximately 3 times per holly leaf.

Repeating the stitching and letting your stitches not match up with the previous line every time makes this simpler to sew. You don’t have to worry about being precise because we are making a deliberate ‘design choice’.
In order to avoid having to cut my thread for every leaf and berry I let my holly leaves slightly ‘touch’ each other so that I could stitch from one leaf to the next.
I also added two holly berries at the base of each set of leaves which also helped with travelling. I treaded the holly berries like ‘pebbles’ and stitched around them several times in a circle to secure them.

One thing to keep in mind is that there will be more space for leaves on the outside of our wreath circle than the inside, so occasionally I skipped an inside leaf to make up for this size difference (see photos).
Merry Christmas Applique Letters
When my holiday wreath was finished I decided the quilt needed a little but more of a festive touch.
So I chose to add the words Merry Christmas in the center.
If I had planned to add letters from the beginning (which I didn’t), I could have used my AccuQuilt alphabet die for the letters by making my wreath size bigger. But as it turned out the letters in the die were too big for the center of my wreath!

So…I used a workaround. I printed out the words in Microsoft Word, testing and printing the font size until it fit in my circle.
The size of your letters will depend on the size of your wreath and what font size you choose. My letters were in ‘Cooper’ font in Microsoft Word and I printed them at 210pt font size.

I then used a lightbox (you could also use a window on a bright day) to trace the letters onto the paper side of an iron-on fusible product.
Use a regular pen or pencil and not a fabric pen as when you apply the iron to fuse your fabric on – you don’t want the lines you trace to disappear!
If you are going to use this technique remember you have to reverse your letters when you trace them so that when you iron your fusible onto the wrong side of your fabric your letters will be the right way around!
I used dark red fabric for the letters. I used approximately 2.5″ x 30″ strip but you could also cut each letter from red scraps from your scrap bin.

Follow the directions for fusing your product onto your fabric.
Then cut your letters out individually following the lines you traced.


I fused my letters in place in the center of my circle using my ruler to mark out the center (as best I could!).


I then used the same stitching techniques I used for the wreath – raw edge applique going around 3 or 4 times. However, this time I did need to cut thread in between each letter.
Scrappy Christmas Binding
For my lap quilt size (final quilt size 50″ x 60″) I needed approximately 220″ of 2.5″ binding strips.

I still had plenty of the Christmas Fabric fat quarters from the quilter’s challenge after cutting my strips for my holly leaves so from each of the 12 fat quarters I cut a 2.5″ x 22″ strip and pieced my scrappy binding from that. I ended up with a bit extra (you really only need 10 strips) but I like to give myself that little bit more just in case and I then store the leftovers in a bin for future scrappy binding projects.

I used my favorite quilt label method of sewing my label to the binding.
Finished Christmas Tree Wreath Quilt
Here is my finished quilt! I am really happy with it.


I used an anti-pil grey fleece for my backing fabric. If you’ve never used fleece for a quilt back you are missing out, it makes quilts, especially a Christmas quilt, so much snugglier!
Here also are some other options for quilt backing.

As I said above this was part of a collaboration challenge with some other quilters and as part of this, I will be giving this quilt away to one of my YouTube Subscribers in December 2023. Subscribe to my channel and look out for my video in December to find out how to win it!
Top Tips
- Don’t forget to reverse your applique letters on your fusible so they turn out the right way around! A light box or window on a bright day will help with the tracing.
- Add iron-on double-sided fusible to your fabric before you cut your shapes out if you plan on using fusible. You can save the offcuts of the fabric with the fusible on the back for collage quilts.
Frequently Asked Questions
Yes of course you can! You can quilt the background fabric however you like on your domestic. If you are comfortable with straight-line quilting with a walking foot do that, if you have a free-motion foot you can do the same pattern I did on your domestic.
In order to add the holly leaves a free-motion foot would make it easier to be able to move around the sides of the leaves and berries, but if you are making a smaller quilt or you are comfortable rolling and maneuvering your quilt around under your throat space you could attach your holly leaves with a straight stitch like I did or use a zig-zag or blanket stitch for a different look.
Other posts you might enjoy:


